- All
- Disposal Troubleshooting
- Disposer Cleaner
- Disposer Installation
- Food Waste Disposers
- Hot Water Dispenser
- Hot Water Dispenser Troubleshooting
- Mr. Scrappy
- UV-C Air Sanitizer
- UV-C Installation
Fiberglass insulation holds up quite well to UV-C. The UV-C will not affect the “glass” component in the insulation, it can affect the binders in the insulation, but overall we tend to not worry about insulation if it is glass based. Same thing can be said for filters, i.e. synthetic filters will get eaten up by the UV-C, but glass-based filters (e.g. HEPA) hold up to UV-C.
Life of UVC lamp is 9000 hours.
Our Hot Water Dispenser and Faucets utilize food grade NSF approved plastic tubes and stainless steel.
The most common cause of bad taste or odor is using unfiltered water. However, this should only occur if you have had this similar problem in the past.
The other common cause is by using plumbers putty used for sealing threads on plumbing connectors or newly repaired plumbing fixtures, pipes feeding the hot water tank. This results in a bad odor and can be cured by purging the hot water tank and cleaning any possible collected debris from the tip of faucet.
The hot water tank and faucet should not be providing any odor or bad taste on its own.
NOTE:
- The thermostat activates the heater after water temperature in the tank drops approximately 15°F (8°C) from the maximum setting.
- If a water filter is connected to the inlet line, change the filter element at recommended intervals or often.
- If lowering the thermostat setting does not stop the boiling, unplug the power supply cord and contact customer service.
After the hot water has been dispensed during normal usage, the tank immediately starts the reheating process which brings the water temperature back up. During this time it is normal that the spout may drip for few minutes while the water is reheating in tank. What you see is steam condensing in the faucet.
If the Water dripping is continual it could be:
- Low water supply pressure below 35 psi to the heating tank.
- The Faucet water supply tubes may have a kink, loops, or a section that is positioned too low causing abnormal water flow.
- There should be no obstructions such as any kink, sag or loops in the faucet tubes.
Check water supply valve is fully open. Check the water pressure should not be below 35 PSI. Low water pressure will cause the expansion chamber not to function properly.
It is better to have the tank installed close under the faucet to avoid kinks, sag, and loops.
If a Filter is connected in line, check if the water is flowing out from the filter with normal pressure.
After the hot water has been dispensed during normal usage, the tank immediately starts the reheating process which brings the water temperature back up. During this time it is normal that the spout may drip for few minutes while the water is reheating in tank. What you see is steam condensing in the faucet.
If the Water dripping is continual it could be low water pressure to heating tank. Please check for any kinks, loops, and low suction in the faucets tubes.
Solution: Check if water supply valve is fully open. There should not be any obstructions or any kinks or loops in the faucets tubes.
It is better to have the tank installed close under the faucet to avoid kinks, sag, and loops.
If a Filter is connected in line, check if the water is flowing out with normal pressure.
Check if power supply to the heating tank is ok.
If the power supply is ok, turn the temperature control knob clockwise as far as possible. Wait for 15 minutes and check the water temperature.
If the water is still not hot; Turn the temperature control knob 3-4 times clockwise and counter clockwise and then turn the control knob clockwise as far as possible Wait for 15 minutes and check the water temperature.
If the water is still not hot, there may be problem with the internal heating mechanism or thermostat contacts are stuck.
The dual hot/cold faucet has a built-in safety mechanism for the hot water. The hot water lever has a red dot on the top. Push down on the red dot, noting there is a spring mechanism built into the lever assembly. While the lever with the red dot is depressed, the user can then move the lever downward to release the hot water.
The cold water lever does not have this spring mechanism built into the lever and can simply be moved down for water.
Please visit the Mr. Scrappy store for parts, and accessories. You will also find some useful kitchen products to complement your disposer including color sink flanges, cleaning tools, and more.
UV-C can cause a breakdown of the material over time, if the plastic is not UV resistant. Lab tests reveal no measurable breakdown of plastic material will occur if you position the bulb 30 inches or more away from plastic surfaces.
Prior to any service of the HVAC system or ductwork, the UV-C Air Sanitizer should be unplugged and turned off. Read all warning labels and service procedures located in the installation manual.
Roughly, the light will use 25 watts of power for one bulb.
Many smells are not addressed by the UV-C Air Sanitizer, however, some unpleasant smells emanate from the development of microorganisms. the UV-C Air Sanitizer works to reduce mold and other common household germs, which in turn can create a fresher smelling environment.
No! Joneca does not endorse the use of ozone in spaces that are occupied. Ozone has been linked to respiratory problems and is a known carcinogen. Because the UV-C Air Sanitizer does not produce ozone, the unit can remain turned on at all times. This feature allows the UV-C Air Sanitizer to continuously attack the microorganisms in the system.
No. This is not necessary. During normal operation of the heating or air conditioning, the blower will circulate the air over the UV bulb from 50-75 times a day, which is sufficient. During moderate weather, when neither the A/C or heat is on, it is recommended to open the windows to allow for fresh air infiltration and/or to operate the blower continuously (turn on the fan) to circulate air over the UV light.
Compared to high costs of medical treatment and missed work as a result of poor indoor air quality, the UV-C Air Sanitizer pays for itself quickly. the UV-C Air Sanitizer costs only pennies a day to operate, consuming about the same amount of energy as a 25-watt light bulb.
Yes! the UV-C Air Sanitizer and other UV products have been installed in all types of buildings including: homes, hospitals, offices, public buildings, food preparation plants, electric utilities companies, and more. Consumers constantly report improvements in air quality and reduced respiratory illnesses.
Moisture collects on the air conditioning coil, creating a damp surface for growth of mold and microorganisms. With the UV bulb over the A/C coil, the bulb will continuously infuse the coil with its rays, successfully disinfecting the air as well as keeping the coil clean.
Microwatts per centimeter at 1 meter is an intensity rating: the amount of UV-C energy exposed onto one square centimeter of surface area on a target placed 1 meter from the bulb.
Yes. The bulb may need to be cleaned every 3 to 6 months depending on its functioning environment. Dirt and oil on the surface of the bulb reduce output intensity. Upon installation, the bulb should be wiped down with the alcohol swab provided. Simply remove the bulb and clean with alcohol. Avoid touching the bulb with bare hands. The oils in your hands can reduce UV output.
It is suggested to regularly inspect air health’s operation through the view port to make certain the bulb is on. It is also essential to change the UV bulb yearly, as the intensity of the bulb’s output diminishes over time. Studies indicate that after 12 months, ultraviolet output will fall below minimum requirements for protection. Even though a bulb may appear to be operating satisfactorily, output intensity may be significantly reduced. The changing of the UV bulb should be done during yearly furnace or A/C Inspection.
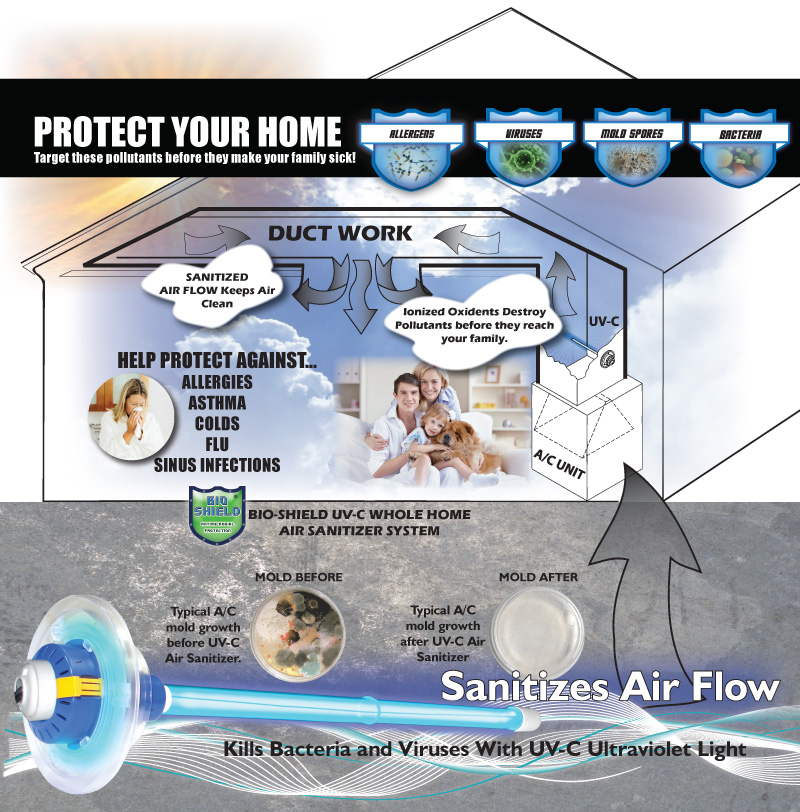
UV-C is the invisible, ultraviolet, C-band radiation that makes up part of the sun’s light spectrum. By altering the DNA and RNA and effectively sterilizing the organisms, the UV-C light prevents growth and germination of microorganisms. Once sterilized, they cannot reproduce and with their short life cycles, they are successfully killed.
UV energy has been successfully used for many applications including water treatment, hospitals, etc. the UV-C Air Sanitizer was designed specifically for use in HVAC systems. It creates a consistent, high output of UV energy. the UV-C Air Sanitizer’s intensity output maximizes microorganism disinfection and guarantees cleaner indoor air.
The warranty of the UV-C Air Sanitizer is one year from the date of purchase for the unit and 30 days for the bulb.
After 375 days of operation, 9, 000 hours, the bulb starts to become “solarized”. The UV-C output is condensed to around 80% of its original intensity, which steadily weakens thereafter. The bulb will still be illuminated, producing visible light, however, the UV-C light will diminish reducing effectiveness.
Install the UV-C Air Sanitizer in either the supply or return plenum of the warm air heating system. With A/C systems, the best location is over the air conditioning coil.
Microorganisms collect in moist, dark places. When the light remains on, the reproduction of these organisms may be reduced. The method also simplifies the installation. Complex wiring into the fan circuit is eliminated. Isolation relays, sail switches, and pressure switches are not required for installation. The unit plugs into a standard 120-VAC outlet. It is also more energy efficient to leave the bulb on constantly. Similar to fluorescent lights, the energy necessary to switch on the UV bulb is high, while functioning energy is low.
Yes. By reducing airborne contamination, air health can offer relief to many allergy and asthma sufferers. The device is not solely for people with respiratory disorders. Your whole household can benefit from breathing “healthified” air.
A quick look from a distance may not be a problem, but looking at a UV-C bulb close up for 5-10 seconds could injure the eyes. UV-C light will injure human tissue following continuous exposure and can severely burn the eyes. Shielding the eyes with plastic protective goggles is highly recommended. UV light cannot be seen. When you look at a UV bulb, you are seeing the visible light, not UV light. There are numerous bands in the UV light spectrum. UV-C is used to control mold and microorganisms.
Installation can take 10 minutes. We suggest allotting 30 minutes to play it safe.
Yes! The return air plenum is an optional location. We recommend the unit be positioned upstream or before the humidifier. This should prevent the bulb from getting water spots. Water spots will reduce UV output.
The two primary benefits to using UV light are disinfecting air and preventing growth of mold. The UV light radiates a surface to keep mold from growing in that area and disinfects the air stream as it passes through the HVAC system. In one pass over the UV bulb, a high disinfection rate is not normally accomplished in the air stream. With repeated circulation of air through the system, a major disinfection rate is accomplished, making use of UV light very positive.
Over 90% of people’s time is spent indoors. Concentrations of microorganisms will increase indoors, with little or no ventilation. With a larger number of death cases being caused by various bacteria, controlling the development and spread of pathogens is of chief concern in indoor environments. According to indoor air quality experts, controlling airborne microorganisms is the next major challenge of the HVAC industry.
UV has been used to purify air since 1936. It was first used to sanitize air in a surgical operating room. UV has been used in schools to reduce the development of epidemics. Restaurants, veterinary clinics, barber shops, incubation rooms, and hospitals also use ultraviolet light applications.
If properly installed inside the duct, air health is a safe and practical product. However, direct exposure to UV light is not recommended, as it may cause damage to skin and eyes. UV light does not pass through solid materials such as plastic, glass or metal ductwork.
Yes. the UV-C Air Sanitizer uses powerful UV light to help reduce and kill mold, bacteria, viruses, dust-mites and other airborne invaders.

The UV-C Air Sanitizer installs inside the plenum of a forced air heating or air conditioning system. The powerful UV-C rays reduce airborne contamination, as air passes the bulb.
Yes, all of our voltage options can be used at 50Hz.
Limit rules of thumb are 32-170° F, 99% RH and 1000 fpm, respectively.
No. UV-C will degrade all of the organic material on and within a coil, usually within 30 days or less. Prior cleaning of the coil is not necessary, and may delay the benefits of UV-C.
For IAQ, improved heat transfer, reduced maintenance and odor, the rule of thumb calls for about 24″ of UV-C Emitter length for every 4 square feet of coil face area. The factory should always size applications involving infectious disease applications.
No.
Installation instructions are available. Depending on the fixture size and style, installation time can average about 15-20 minutes per fixture.
BUVAS installs from outside your unit—no need to open equipment to get going, or to change the lamp. Simply apply the installation template and follow its directions.
BUVAS’s lamp and lamp socket are water resistant, shock resistant and built to last. Its low voltage meets all codes. The BUVAS is safe and simple— just right for today’s requirements— and its affordable and easy to install.
The factory must always be involved for infectious disease applications.
Bio-Shield UV-C Air Sanitizer fixtures are designed specifically for installation in HVACR applications. On existing systems, infestations always exist. Therefore, the best results are obtained when the light is located downstream of and facing the coil. In this location the user can expect the highest efficacy in eliminating surface (coil and plenum), drain pan and airborne microbes. On new systems, it can be placed either up or downstream of the coil and aimed at the coil.
No, a UV-C fixture is an air conditioning component that is used in addition to other system parts. These include the coil, heating core, fan, dampers, humidifiers, filters, etc. All are designed to do some form of work within the air handler or on the air.
The UV-C Air Sanitizer should be used in conjunction with standard and high-end filters. HVAC filters trap airborne particles based on their size, allowing most microorganisms to pass through undeterred. The UV light attacks microorganisms. It is recommended to install the UV-C Air Sanitizer downstream of the air filter.
In commercial, industrial or institutional buildings, a Bio-Shield UV-C installation offers the most rapid payback in the industry. A typical installation can pay for in less than two years and save thousands of dollars thereafter in energy and maintenance costs. This is possible because the devices continually clean coils, drain pans, plenums and ducts, reducing or eliminating costly cleaning programs. HVAC energy costs are lowered by improving heat transfer and increasing net cooling capacity. General IAQ is improved for better productivity and less absenteeism. Product quality, shelf life and yield in processing plants are improved as well.
No, Bio-Shield UV-C devices do not produce ozone or other secondary contaminants.
Yes, applying UV-C at the coil dramatically reduces the overall activity in the rest of the A/C system as well as the space. There is scientific evidence of this by Dr.’s Richard Shaughnessy and Estelle Leviten, Tulsa University. View Scientific Study
Yes. The Bio-Shield UV-C Air Sanitizer degrades organic buildup in coils, keeping coils continuously clean. This lowers HVAC energy costs by improving heat transfer and increasing net cooling capacity.
UVV light refers to another wavelength in the ultraviolet spectrum. Some UV-C devices also produce light in this wavelength. The manufacturers of these devices promote UVV as an added tool for IAQ control, saying that UVV attacks microorganisms, chemicals, and odors. While this may be true, it is important to understand that UVV (unlike UV-C) will also “attack” occupants in treated spaces by adversely effecting human lungs!
The reason for this is that the shorter (185 nanometers) wavelength of UVV light actually generates ozone. This occurs because UVV light reacts with oxygen to break it into atomic oxygen, a highly unstable atom that combines with oxygen to form O3 (ozone). The American Lung Association states that “exposure to ozone causes a variety of adverse health effects, even at levels below the current standard.” And the U.S. Food & Drug Administration says: “In order for ozone to be effective as a germicide, it must be present in a concentration far greater than that which can be safely tolerated by man and animals.” The longer (254 nanometers) wavelength of UV-C light, by contrast, provides highly effective air, surface, and water disinfection without producing any harmful ozone.
The materials and methods of UV-C lamp construction determine whether a given UV-C device will produce both UV-C and UVV light or only the safer UV-C wavelength. Bio-Shield UV-C devices do not produce any UVV.
The two terms are basically synonymous. Ultraviolet Germicidal Irradiation (UVGI) is a term used by Federal Agencies such OSHA, NIOSH and the CDC when referring to UV-C.
Yes, Bio-Shield UV-C Emitters continuously clean coils, drain pans, plenums and ducts; improves product quality, shelf-life and yield in food processing plants.

The “C” wavelength targets the DNA of microorganisms, causing cell death or making replication impossible. The UV-C energy kills or inactivates microbes, eradicating surface biofilm.
tudies (Health Magazine) show one out of six people who suffer from allergies do so because of the direct relationship to fungi and bacteria in air duct systems. If you or your family is one of these sufferers, studies show these conditions can be triggered by molds, dust and other indoor contaminants (Institute of Medicine). UV-C Light can alleviate your symptoms by attacking your triggers such as dust mites, molds and bacteria. By reducing the impact of these triggers, UV-C Light can alleviate the following:
Asthma, Allergies, Hay Fever, Fatigue, Insomnia, Dizziness, Depression, Headaches, shortness-of-breath, coughing and wheezing.
Also, when someone in your household catches a virus (cold, flu) the virus will be killed off sooner. Before centralized HVAC existed, ill family members would often get isolated in a dedicated room, so that no one else in the family would get sick. However in modern times, there is no longer a “sick room” because the air in all the rooms is pulled back into the main duct system and re-distributed everywhere in the house. With a Bio-Shield UV-C Air Sanitizer system, you can now create that “sick room” once again. The viruses lurking in that room where a family member is ill will eventually get pulled back into the duct system and be killed by the UV-C light, keeping everyone else in the house at a lower risk of getting sick.
UV-C Lights kill viruses and super small bacteria that don’t get trapped by the thickest of furnace/AC filters. Even HEPA filters can’t catch them. Viruses are as small as 0.003 microns and bacteria down to 0.2 microns. HEPA filters, if you’re lucky, claim to catch 0.3 microns, but good luck getting any airflow. Thick filter = minimum air flow, great filtration. Thin filter = maximum air flow, little filtration. Optimum filter (MERV 9-11 rating) = good filtration and good air flow.
Studies have shown that inadequate ventilation in homes causes indoor air to be up to 2-5x more polluted than outdoor air. With up to 65 million North Americans suffering from asthma (8 million children), allergies or other respiratory issues, these conditions can be triggered by molds, dust and other aggregates. (Studies have also shown that one gram of duct dust can contain up to 50, 000 bacteria).
UV-C is a type of ultraviolet (UV-C) energy in the 260-nanometer frequency. The “C” wavelength is the most germicidal in the UV-C spectrum.
Yes! Disposer Care® is designed to clean the entire disposer unit including the non-disposer-side sink.
If the sound is not heard, don’t panic, it doesn’t mean that Disposer Care® didn’t work. The issue may have been with your stream of water. If the flow going into the drain is too strong, the sound will be consumed by the water flow. Regardless, as the foam wells up, it is doing the job of cleaning the sidewalls and splashguard that cause the odors.
Excessive build-up in the disposer may require additional uses of Disposer Care®. One recommendation we make is to run a stream of hot water into the disposer for a couple more minutes before using Disposer Care® to break up the excessive waste. However, never use hot water alone as it may melt the build-up that may re-solidify in your pipes as it is flushed from the disposer.
You should never pour grease or other thick liquids down the drain because they can solidify and cause further blockage to you drains and pipes, in addition to causing a stench.
This issue may have happened for a number of reasons, to properly use Disposer Care® please ensure the following steps are applied:
- The disposer is turned off and all remaining food waste is flushed out with water
- When lessening the water stream, make sure the flow is not too strong. By rule of thumb, we say stream should be the width of a pencil.
- The water temperature must be HOT.
- Water should continue to run (at a pencil-width stream) while disposer is running and throughout the entire process.
- Do not sever the package before using. It is biodegradable and will decompose in the disposer.
- If the inner content is hardened together, knead the packet with your fingers to break it up.
Check out Mr. Scrappy.com for compatible accessories.
https://mrscrappy.com/
DO:
Use a medium flow of COLD water. If hot water is used, grease tends to coat the pipes instead of being flushed away.
Grind hard materials (cooked bones, pits of fruit). This is necessary every so often to keep the lugs moving freely and to keep the grind chamber clean.
Do continue running cold water for 25 seconds after grinding is completed to flush the drain line. Remember the drain line from your sink may run for 30 feet or more before it exits your home.
Flush for cleaning with cold water. An occasional lemon or lime slice will help to deodorize the grind chamber and elements.
DON’T:
Don’t use HOT water when grinding. It is acceptable to drain hot water into the disposer between grinding periods.
Don’t turn off disposer until grinding is complete. Wait until ALL food is ground before turning the disposer off.
Don’t grind extremely fibrous materials (corn husks). These materials tend to form hard clusters of fiber which do not drain properly and interfere with the grinding elements.
Don’t fill disposer with a lot of vegetable peels all at once. Instead, turn the water and disposer on first, and then feed the peels in gradually.
Don’t grind clam or oyster shells, glass, metal, cloth, or harsh chemicals. These materials are too abrasive and will eventually wear down the grind chamber.
Don’t dispose large amounts of fat or hot grease in food waste disposers.
The Bio Shield food waste disposer will take most types of food waste, including:
|
NO. They contain no knives or blades… they use centrifugal force generated by the turntable to hurl the food waste against the grinding ring, shredding it into fine pieces.
All motors have the capacity to wear out eventually. How quickly depends on the stress or the load placed on the motor. The Bio Shield disposer models are designed to be long lasting. The durability and performance increases through the model range. The Heavy Duty and Deluxe models have slightly bigger motors which generate more torque and cutting power. This puts less stress on the motor, giving the Bio Shield disposer longer life.
The use of permanent magnet motors in Bio Shield disposers is vital. The nature of the motor is that it increases torque as the load increases. This not only means top performance when a full load of food waste is being ground, but also prevents jams from occurring frequently.

Some waste disposers smell because food accumulate![]() s under the Splashguard, allowing bacteria from food particles to grow and generate odors. This cannot be cleaned with our competitor’s units without removing and dismantling their disposer from the sink. All Bio Shield disposer models have a Splashguard that is easily removed from the top of the sink for cleaning or replacing. Food odors are eliminated if this is done regularly. We also are the only disposer with Bio-Shield antimicrobial for odor protection. Our other products, including Mr. Scrappy Disposa Clean and Disposer Brush can be used for effective odor prevention (Mr. Scrappy Disposer Accessories).
s under the Splashguard, allowing bacteria from food particles to grow and generate odors. This cannot be cleaned with our competitor’s units without removing and dismantling their disposer from the sink. All Bio Shield disposer models have a Splashguard that is easily removed from the top of the sink for cleaning or replacing. Food odors are eliminated if this is done regularly. We also are the only disposer with Bio-Shield antimicrobial for odor protection. Our other products, including Mr. Scrappy Disposa Clean and Disposer Brush can be used for effective odor prevention (Mr. Scrappy Disposer Accessories).

SPLASHGUARD
No, because Bio Shield disposers are constructed from stainless steel (grinding components) and thermoplastic materials (grinding chamber). We offer a lifetime warranty against failure due to corrosion.
GRIND RING –
DRAIN HOUSING –
HOPPER –
TURNTABLE –
This is a problem mostly experienced with our competitor’s products. They use induction motors which are slow starting and could jam if food is placed in the disposer before it is switched ON. Bio Shield disposers are designed not to jam by using permanent magnet motors. This motor produces high torque (twisting power) immediately when switched on. This feature prevents jams. In the unlikely event that a Bio Shield disposer jams, dejamming is very simple. Turn off the switch to the disposer, check for foreign objects, dislodge the object by rotating the turntable with a long screwdriver or broom handle and remove the object.
 DEJAMMING
![]()
None of the models are noisy, but the degree of sound insulation improves with the model range. The Heavy Duty and Deluxe models are exceptionally quiet due to their full sound shell insulation. All of our disposers feature the exclusive Torque Master Grinding System with its balanced turntable and armature help keep noise and vibration to a minimum.
No, waste disposal with the Bio Shield disposer is quite simple. Four easy steps are all that is needed:
1. Turn on the Water.
2. Switch on the Bio Shield disposer.
3. Scrape the food waste into the disposer.
4. Let the water and the disposer run for 25 seconds after the waste is gone and then turn off the water and the disposer.
The Bio Shield disposers are designed to fit sinks with a 90mm sink hole. If the sink hole is not this size, it is a simple matter to connect your disposer by use of one of the following methods:
1. Stainless steel, ceramic or marble sink holes can be enlarged by using either a hole punch tool or a hole saw.
2. Porcelain sinks can be fitted with a 60mm adapter that is available to replace the current mounting assembly on the Bio Shield disposer.
Through the use of our Speed Master mounting system or our 3-Bolt Mount systems, Bio Shield disposers are inexpensive and simple to install. Most installations can be done without hiring a professional. The 3-Bolt mounting system is an excellent choice if you want to keep your existing 3-Bolt sink flange. Just twist on the new disposer and reconnect plumbing. Watch the video below on how easy this process can be.
All models work by simply and safely grinding food waste material into very fine particles, which are then flushed through the waste pipes without harm. Since Bio Shield disposers use no blades or knives, they are very safe to operate.
*Video Snipet from InfoGraphics https://www.youtube.com/user/infographics1/about
Our disposers use the latest technology including permanent magnet motors that provide high torque and faster grinding to prevent jams. We also utilize corrosion-proof materials to prevent rust and extend the life of the product.
Bio Shield disposers also provide the following advantages:
Energy Efficiency
Corrosion-Free Materials (Corrosion is the #1 cause of failure in the competitor’s units.)
Competitive Pricing
Exceptional Quality Standards
Compactness

Improved Health and Sanitary Conditions for their Family
By using a food waste disposer in the home, a homemaker immediately improves the sanitary conditions of the kitchen and waste storage areas. Eliminating food waste through a disposer system effectively removes a major cause of insect and rodent infestation, as well as bad odors.
Convenience and Time Savings
In today’s busy households, using a disposer saves time and provides great convenience in eliminating food waste, especially during meal preparation and cleanup.
![]() Environmental Concerns
Environmental Concerns
Food waste disposers are the environmentally friendly method of disposing of food waste. They reduce and recycle waste by shredding and pulping the organic food waste material into very small particles that are flushed down the drain.
For speed master mounting systems (threaded)
 |
Position Your Support Ring BEFORE the Cushion Mount. |
 |
The rim (edge) of the flange fits perfectly within the groove of the Cushion Mount creating a flush appearance. Apply pressure with your thumbs around the rest of the cushion to attach completely . This shows the correct position. |
 |
Side View
Another view of a correctly positioned Cushion Mount. |
 |
Cutaway
Another view of a correctly positioned Cushion Mount.
|
 |
Finished Look
Another view of a correctly Installed Cushion Mount. |
 |
This Cushion Mount is installed incorrectly!! |
FOR WASTE DISPOSERS EQUIPPED WITH A FOR WASTE DISPOSERS EQUIPPED WITH A GROUNDED PLUG-IN POWER CORD.
A. PLUG INTO APPROPRIATE OUTLET This appliance must be grounded. In the event of a malfunction or breakdown, grounding provides a path of least resistance for electric current to reduce the risk of electric shock. This appliance is equipped with a cord having an equipment-grounding conductor and a grounding plug. The plug must be plugged into an appropriate outlet that is properly installed and grounded in accordance with all local codes and ordinances. If the supply cord is damaged, it must be replaced by the manufacturer, its service agent or similarly qualified person in order to avoid a hazard.
-OR-
B. CONVERT TO PERMANENT WIRE INSTALLATION 1. Remove Cord and Plug from the disposer – Simply cutting the plug off the existing cord is not allowed and voids the warranty. 2. Follow instructions below for Permanent Wire Installation instructions.
PERMANENT WIRE
INSTALLATION INSTRUCTIONS
Grounding Instructions
This disposer must be connected to a grounded, metal, permanent wiring system; or an equipment-grounding conductor must be run with the circuit conductors and connected to the equipment-grounding terminal or lead on the disposer. An acceptable motor control switch with a marked off position shall be provided at the time of installation to disconnect the disposer from all ungrounded supply conductors. The switch shall be mounted in sight of the disposer or in sight of the sink opening for the disposer.
WARNING: Electric Shock Turn off power before installing or servicing disposer. All wiring must comply with local electrical codes. Do not connect electrical current at main breaker panel until adequate ground is established. Inadequate connection of the ground wire can result in a risk of electric shock. Consult with a certified electrician or tradesman if there is any doubt whether the disposer in inadequately grounded. Your disposer must be adequately grounded.
1. Turn off or disconnect all power to the wall junction box serving the disposer.
2. Open the junction box in the wall and remove the wire nuts or electrical tape or whatever is tying the old disposer wire to the electrical wire inside of the junction box.
3. Open the end bell plate at the bottom or the disposer. If you are using flexible armored (BX) cable: 1. Install cable fitting in the disposer end bell hole.
If you are using flexible armored (BX) cable:
1. Install cable fitting in the disposer end bell hole.
2. Secure the cable to the fitting and install an insulating bushing or equivalent.
3. Connect white wire from the junction box to the white (or blue) wire of the disposer.
4. Connect black wire from the junction box to the black (or brown) wire of the
disposer.
5. Connect bare ground wire from the junction box to green ground screw within the
disposer end bell.
If you are using nonmetallic-sheathed (ROMEX) cable:
1. Install cable fitting in the end bell hole and secure the cable to the fitting.
2. Connect white wire from the junction box to the white (or blue) wire of the disposer.
3. Connect black wire from the junction box to the black (or brown) wire of the
disposer.
4. Connect bare ground wire from the junction box to green ground screw within the
disposer end bell.
If your power supply cable does not include a grounding wire, one must be provided. Attach a copper wire securely to the disposer ground screw and attach other end of ground wire to a metal cold water pipe. Do not attach ground wire to a gas supply pipe. Use only UL Listed grounding clamp. If plastic pipe is used in your home, a qualified electrician should install a proper ground.
All of our disposers feature the exclusive Torque Master Grinding System with its balanced turntable and armature that help keep noise and vibration to a minimum, however, it can become really noisy if something gets in there to cause a ruckus. With the disposer unplugged, grab a flashlight and take a look down the drain and see if you notice anything that can be causing the noise. Plastic or metal items are usually the culprits.
Yes. When Stainless Steel Impellers swing into position a brief noise may occur from contact with a protrusion on the turntable. The noise should be brief not continuous.
Too much hot water directly on the splashguard will cause it to deform. Replacements available through our Mr. Scrappy Store.
Unless your model specifies that it is Batch Feed or BF, it is a continuous feed disposer.
Note: Both Continuous Feed and Batch Feed versions have the same grind process but different on/off switch mechanisms and modes of loading the food waste.
Continuous Feed models require a wall switch (or Air Switch option). Food waste is fed through the splash guard and can be added to the grind chamber all the time the unit is running.
Batch Feed Disposers include the On/Off switch in the throat of the Disposer and after food is placed in the grind chamber the switch is activated by the sink stopper. Only water is allowed to enter the Batch Feed unit whilst in operation. As soon as the sink stopper is removed the disposer automatically turns off.
It could be a power problem. Check the power to the circuit that feeds the disposer. If the breaker is OK, then check the power at the switch. If you have power coming to, but not leaving the switch, then the switch is bad. Turn the circuit off and replace the switch.
The cushion mount if installed correctly will allow your mounting ring to easily drop over it, allowing room for the projections on the disposer to fit into. Looking at the Sink flange you will see a lip below the groove at the very end of the flange.
Note: If the cushion mount is installed correctly the lip at the end of the flange will be fitted into the groove, in the cushion mount.
Examples
UV-C is not a replacement for filters. UV-C addresses the problem of coil “biofilm” which is usually downstream of the filters. Antimicrobial treated filters rely on direct contact to kill the microbes. As the filter builds a layer of dirt on it, this direct contact is eliminated and the microorganisms will not be affected by the chemical treatment. Therefore, treated filters will not accomplish the task of eliminating the growth on the coil.